Microsoft Live in nidang in a bawl ahi Office Live pan in a piak "Office Live Small Business" program pen a beisa zang nanwlo uh a, program a hoih zaw leh laigelhna a ding van tampi aki ngah zaw tam ahi Office365 tawh hong update ta uh a, a beisa hun a, piak uh peng ki zang thei nawnlo hi.
Thank you for being an Office Live Small Business customer. The service has now been
discontinued. Microsoft®Office 365 is the next generation of productivity services for small businesses. Learn more at www.office365.com.
If you had a domain (also known as a customised web address) hosted on Office Live, your website has been redirected to a no longer available page. If you want to continue using this domain, follow the directions that were e-mailed by Melbourne IT, the Office Live domain registrar. You'll need to find an alternative web hosting provider and update the domain record.
If your website has been deleted and you need access to your Office Live Small Business website and e-mail data, read our frequently asked questions to understand your options.
A nuai a mun pan in a thak in laih tota uh a Office 365 cih mintawh zangto ta uh hi.
Windows 7 ah Ultimate leh Enterprise te ah Font pen khat bek om lo in, nih leh thum om hi. Tua hi a midang kiang pan 2nd hand Laptop/Window 7 nalei leh a Display Language pen a mau installation Package tawh kisai in English hilian lo kha ding hi. Tua pen English ah na laih kik nop leh a nuai a step te na sin in.
Step 1. Start Menu meek in tua teh Control Panel ah pai inla, Clock, Region and the Language cih ah pai inla Region and Language cih icon nameek in. (Tua teng tangin Windows Logo+R mek inla, ong ki dawk box ah "intl.cpl" cih khen in " .. " kihello in.)
Step 2. Tua tak pan in Keyboards and Languages cih na meek in.
Hih a lim a dan in Choose a display language ah nang zat English leh Deutsch maw Traditioanl Chinese maw nam2 mu ding in tua ah English cih click in a nuai ah Ok tawh pusuak in. Note: A zen2 in nam nih na muh kei leh na zat nop language pen ki install nailo hi ding a, na install masak ngai ding hi.
Tua ciang tawh pen windows user (gtn: administrator: all user) cihte leh Windows login logout te ah ki laih ta hi . Hi mah leh Windows 7 welcome screen leh Windows services ahi (local system, local service, and network service) te ah laih kullai hi.
Step 3. Den a Step 1 na a i gen pen ah pai kik (Win Logo+ R, type: intl.cpl) inla Admintrative cih tab meek in. Copy setting cih na meek in.
Step 4. Tua na meek teh “Welcome screen and new user accounts” kici tegel tick/check inla Ok tawh pusuak in.
Step 5. Na Computer Restart leteh kingah pah ding hi.
Hih tawh kisai in na laih khit a Google Chrome Bowser tawh Google.com pan na search te a result Deutsch/Chinese in ong ki lat veve leh na program uninstall inla a thak install pha in.
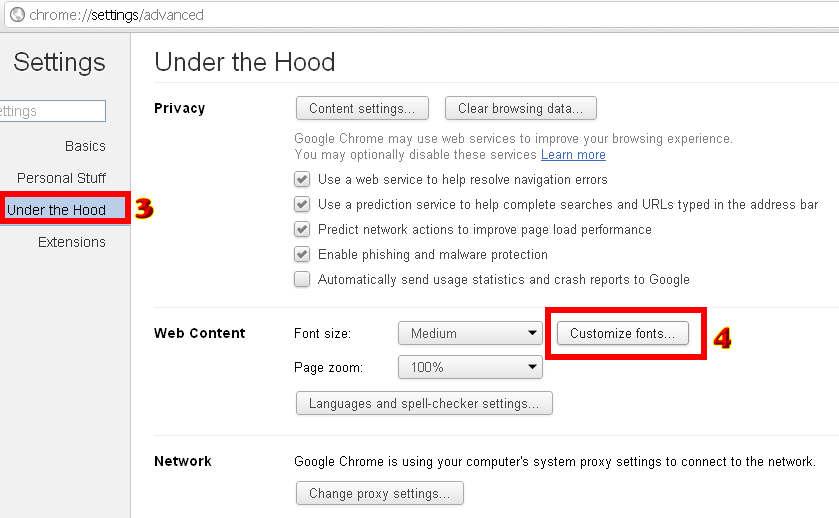
Na internet browser sung ah chrome://settings/content hih URL copy inla, pai in (Google Chrome ah). Tua a ban pen a nuai a lim om bang in zom in. Manglai in akicing zaw in Google website tung pan lamlahna hong ki guang sawn hi.
In order to view Google ads on a website, you need to have JavaScript enabled in your browser. To do so, please follow the instructions below:
Google Chrome (15.0)
Click the spanner icon on the browser toolbar.
Select Options.
Click the Under the Hood tab.
Click Content Settings in the 'Privacy section.'
Select Allow all sites to run JavaScript in the 'JavaScript' section.
Mozilla Firefox (8.0)
Select Tools from the top menu.
Choose Options.
Choose Content from the top navigation.
Select the checkbox next to Enable JavaScript and click OK.
Internet Explorer (9.0)
Select Tools from the top menu.
Choose Internet Options.
Click on the Security tab.
Click on Custom Level.
Scroll down until you see the section labeled 'Scripting.'
Under 'Active Scripting,' select Enable and click OK.
Apple Safari (5.0)
Open the Safari menu on your browser's toolbar.
Choose Preferences.
Choose Security.
Select the checkbox next to Enable JavaScript.
Please keep in mind that upgrading your browser or installing new security software or security patches may affect your JavaScript settings. It is a good idea to double-check that JavaScript is still enabled if you notice problems displaying Google ads. Additionally, if your JavaScript setting is set to 'Prompt', you may encounter a warning about downloading potentially dangerous scripts from a website that displays Google ads. If you are still experiencing problems viewing the ads after ensuring that JavaScript is enabled in your browser, please check if you have any personal firewall or security software installed. support.google.com/adsense/bin/answer.py?hl=en&answer=12654
Windows Internet Explorer Note To allow scripting on this Web site only, and to leave scripting disabled in the Internet zone, add this Web site to the Trusted sites zone.
On the Tools menu, click Internet Options, and then click the Security tab.
Click the Internet zone.
If you do not have to customize your Internet security settings, click Default Level. Then do step 4
If you have to customize your Internet security settings, follow these steps: a. Click Custom Level. b. In the Security Settings – Internet Zone dialog box, click Enable for Active Scripting in the Scripting section.
Click the Back button to return to the previous page, and then click the Refresh button to run scripts.
Enabling and disabling JavaScript
In Firefox, you can configure whether JavaScript in web pages is permitted to execute or not. To allow JavaScript in Firefox:
At the top of the Firefox window, click on the Firefox button (Tools menu in Windows XP) and then clickOptions
In the Options window, select the Content panel.
Enable JavaScript: Select this option to permit JavaScripts to execute on your computer.
To change advanced settings, click Advanced....
Click OK to close the Options window
Advanced JavaScript settings
Through the Advanced JavaScript Settings window, you can configure the permissions for JavaScripts.
Move or resize existing windows: To prevent JavaScripts from changing the position or size of existing windows, deselect this option.
Raise or lower windows: This option allows sites to place windows below or above existing windows.
Disable or replace context menus: When you right-click an item, a sub-menu may appear. This menu, called a "context menu," can be disabled through JavaScripts. To prevent them from disabling context menus, deselect this option. support.mozilla.org/en-US/kb/JavaScript
Opera Software’s Opera version 9
On the Tools menu, click Preferences.
On the Advanced tab, click Content.
Click to select the Enable JavaScript check box, and then click OK.
Click the Back button to return to the previous page, and then click the Reload button to run scripts
Code: cls @ECHO OFF title Folder Private if EXIST "Control Panel.{21EC2020-3AEA-1069-A2DD-08002B30309D}" goto UNLOCK if NOT EXIST Private goto MDLOCKER :CONFIRM echo Are you sure you want to lock the folder(Y/N) set/p "cho=>" if %cho%==Y goto LOCK if %cho%==y goto LOCK if %cho%==n goto END if %cho%==N goto END echo Invalid choice. goto CONFIRM :LOCK ren Private "Control Panel.{21EC2020-3AEA-1069-A2DD-08002B30309D}" attrib +h +s "Control Panel.{21EC2020-3AEA-1069-A2DD-08002B30309D}" echo Folder locked goto End :UNLOCK echo Enter password to unlock folder set/p "pass=>" if NOT %pass%== ထည့္ခ်င္တဲ့ Password ကိုဒီမွာေရးပါ။ goto FAIL attrib -h -s "Control Panel.{21EC2020-3AEA-1069-A2DD-08002B30309D}" ren "Control Panel.{21EC2020-3AEA-1069-A2DD-08002B30309D}" Private echo Folder Unlocked successfully goto End :FAIL echo Invalid password goto end :MDLOCKER md Private echo Private created successfully goto End :End
Sumkhakna leh Vanzuak theihna company ahi AlertPay pen leitungbup gam 190 val ah kizang a, sumnam (currency) 22 ki zangthei ding in akibawl ahi hi.
Tuma kum tampi lai a kipan in AlertPay ci in online pan in sum piak, khak, vanlei theihna leh vanzuakna ahi AlertPay in mailam hun ah Payza cih min tawh hong laihto ta ding uh a, a lui sang in gam tam ah kingah sak zaw ding ban ah, a hoih zaw ding in hong puahto uh cih thu suaksak uh hi.
AlertPay a zang khinsate in amau sumbung sung a om sum phazah, azat ngei uh ID leh Password te akibang mah tawh zang suak thei ding ci in zong genbehna nei uh hi. https://www.alertpay.com
Your AlertPay Just Got Better!
Want even more services and flexibility from your favorite online payment processor? You got it!
Smartphone & mobile phone friendly
More countries and additional currencies
Global bank wires loaded into your e-wallet in more currencies
Enhanced customer support
And more! The AlertPay that you love is becoming Payza this spring – to give you exactly these things! Thanks to a recent merger with UK- based MH Pillars Ltd, a leader in prepaid card solutions, we were able to join forces to take AlertPay to the next level of online payment processing. On May 14, 2012, we’re launching a redesigned website with more service offerings to bring you an even better online payment processing experience. All of your information will transition to Payza.com – so you don’t have to do a thing! Same account number, same personal and financial information, same login & password! Personal Pro Account Members: Apart from a new brand name, nothing changes! All of your information stays the same:
The same account (with your money in it)!
The same personal and financial information!
The same login and password!
BUT, you will get:
New service offerings;
Enhanced customer support; and
A completely redesigned and easier-to-use website!
We are really excited about the new website and the new services – and we hope you will be too!
The AlertPay (soon-to-be Payza) Team
Login na bawl lecin a nuai a bang in alertpay pan in payza.com (paypal ahilo) ah limlah hong suak ding a, tua pan in Debit card/ Prepaid Card vaikhak theih nading hong suak ding hi. A nuai a mun nih sung pan in na deih zawkzawk teel ding ahi hi.
Paypal tawh kibang dektak napi in akibatlohna tampi om hi. Account a nei khat in US lo gamdang khat peuh nahih hang in Payza (AlertPay) akizatna mun khat peuh ah account VERIFY bawl theih ahi hi. Nang ma omna address ah lai hong khak ding a tua pan in laidal sung a om code (nambat) tawh verify bawl ding ahi hi.
A nuai a bang in laikhak na ngah ding a, ni 7 sung in hong theisak kik ding uh ahi hi.
Dear Taang,
Thank you for your interest! You have been successfully pre-registered for the AlertPay Prepaid Card.
If you are pre-selected to order the card, you will be notified as soon as the AlertPay Prepaid Card is available for ordering in your country. You will receive a confirmation e-mail with instructions on how to complete your order.
As you know, the number of cards available per country is limited. If you are pre-selected, act fast and order your card within seven business days.
In the event that you are not pre-selected to order the card, your name will remain in our system and you will be notified as soon as there are more cards available in your country.
In the meantime, if you have any questions or concerns about your Payza account, please do not hesitate to contact our Customer Support team.
Thanks for choosing Payza (formerly AlertPay), The Payza Team
We regret to inform you that as of February 24, 2012, the Grouply service and all individual group websites built on the Grouply platform are no longer available.
When Oodle acquired Grouply in November 2010, the intent was to leverage the Grouply code base to add a community layer to the Oodle Marketplace while continuing to run Grouply as a standalone service. While the integration of Grouply with Oodle was successful, unfortunately, the economics are such that we can no longer justify supporting the Grouply service on its own.
If you are the creator or administrator of a Grouply group, you can request a copy of your group member list and select group data here.
Google Chrome Browser ah Kawllai Font (a diakdiak Zawgyi) bawl theih nading in
A nuai a bang in pai diudeuh ding ahi hi. A lemlohna khat peuh a om leh zong kikup beh theih lai ahi hi. A tuam in setup bawl kul a, (UT-F8) zat ding kisam ahi hi. A lim sung a om dan in bawl ding ahi hi.
PC Advisor - February 2012 English | 148 pages | HQ PDF | 119.00 Mb
Pc Advisor Magazine issuing 13 times a year, PC Advisor provides expert guidance in all areas of technology, whether you are buying, upgrading, downloading software, or just updating your knowledge. PC Advisor features news from the technological world, reviews of new hardware and software, and buying advice, as well as advice on how to get the best from your technology. It features how tos on subjects from networking to windows to photo software, each month.
Computer Shopper gives you independent buying advice, hundreds of product reviews and all the hints and tips a PC owner needs. The DVD cover disc on every issue contains bonus full software and games, plus video content and a photo library.
Window 7 leh Window Vista a piang thei Desktop tunga Shortcutste, Application Files-Typeste Adobe Reader Icon tawh kilaih hi. .Doc te bek hilo in Setup file ၊ Video file te Adobe Reader tawh upmawhloh in i honkhak teh Error kah hi. Hih Error pen Window 7 ah tam diak hi. Aihang Adobe readerhemkhia leng hoih kik hi. Tua pen Adobe reader i Run kiktehError piang leuleu hi. Tua Error pen solve dihni leh.
Notepad tawh anuai a pink color tawh i gelh laimal teng tei dihni leh. Hih pen Window 7a ding hi.
Pink color tawh i gelh teng Exe.reg cih Name tawh Savein. Khat leuleu ah Save as type cih munah All files cihtawh na lah in. Tua hileh Reg ngah ta hi hang. Tua pen Double-click in Run in. Tua teh Restart in. Error hoih kik di hi.
[-HKEY_CURRENT_USER\Software\Microsoft\Windows\CurrentVersion\Explorer\FileExts\.exe\UserChoice] Pink color tawh i gelh teng Vista ading hi a Exe.reg cih Name tawh Savein. Khat leuleu ah Save as type cih munah All files cihtawh na lah in. Tua hileh Reg ngah ta hi hang. Tua pen Double-click in Run in. Tua teh Restart in. Error hoih kik di hi.
Hih atunga teng tawh a lem lian kei leh anuai alink te pan bawlsa na la un. For Window 7
In order to edit designed by info you need to follow those steps.
Step 1: Copy brand.php from plugins/system/helix/features/ to you templates features folder. Now modify it according to your need. Step 1: You can permanently remove brand info from your site. In order to do so, open your templates index.php and remove the line
$helix->addFeature('brand')
joomla credit info can be disabled from the advanced tool from the template within the administrator panel
Editors note:Earlier this week we announced the City of St.Louis is going Google. Today we welcome another guest blogger from Missouri, Mike Matthes, to tell us how he recently moved Columbia to Google Apps for Government.
I grew up in Chillicothe, Missouri. Until last year, I worked for the City of Des Moines in Iowa for 15 years. When I got the opportunity to move back to my home state and became the City Manager of Columbia, Missouri, I jumped at the chance. Columbia is a boomtown with outstanding quality of life that emphasizes the value of public services for the citizens. I find great joy in serving the public, partnering with our city employees, and supporting them as they work with the community.
After I moved to Columbia, I realized the city was challenged by an antiquated email system that couldn’t keep up with the latest technology trends and our employees’ needs. When my iPad acted as nothing more than a paperweight, I knew we needed a change.
Columbia is fortunate to have an open-minded City Council and IT Department, so we started looking for a new email solution last fall. When I worked for Des Moines, I became familiar with Google Apps for Government. We chose the Google email and communication platform for 2,000 Des Moines employees because it could help the city save budget while enabling our employees to be more productive. When I looked at Google Apps again, I was struck by the tremendous product enhancements made in just a year since I last reviewed its offering.
We quickly decided to move all 1,188 Columbia employees to Google Apps for Government after evaluating available email and communication solutions. With the help of Google Apps reseller Onix Networking, all city employees were flawlessly transitioned to Google Apps in April 2012.
The only comments I received were gratitude from our employees for finally being able to communicate and collaborate smoothly. Email and calendar just work, and other advanced collaboration features in Google Apps bring much more efficiency to our workplace. Eighty percent of our employees are mobile, such as police, fire and public works staff. They have been starving for mobile productivity for years. Now they can easily check email, documents, and sites from the field.
Although most reasonable people dread an annual budget process, I’m actually looking forward to it this year because all 18 of our departments will be using a Google Site to collaborate and share information easily while preparing for the budget. This site also integrates a Google calendar that marks budget due dates with a countdown clock for all departments.
For Columbia, going Google is a force multiplier. With resources saved and productivity enhanced, our city employees are able to better focus on their core mission of serving citizens. Being a part of modernization efforts of both Columbia and Des Moines makes my job as a public servant meaningful. Originally published at http://www.google.com/enterprise/apps/business/resources/news.html
Tu-a pen Malware, junk, Virus cih te hepkhiat na hi. A mah pen Portable hilo a hih manin Install ngailo a Double click tawh System ong run ziau ding hi. Na deih leh
Keep your existing installation safe - use Windows 8 in a virtual machine
Virtualisation is ideal for trying out a new operating system. Instead of installing the OS onto a live machine and potentially overwriting, or generally messing up a working OS, virtualisation leaves your current installation untouched.
No worrying about a messed up MBR, freeing up space on your drives for a new partition or having to route around for drivers just to get back online.
Virtualisation is a lot faster than it once was as well. Oracle VM VirtualBoxis similar to Microsoft's own VirtualPC, but boasts more advanced features and better system integration. It's also free.
These both boast support for hardware virtualisation, which means you'll enjoy a responsive machine after installation.
You will need a processor that supports hardware virtualisation, but given AMD and Intel have supported such extensions for a number of years, so as long as your PC is reasonably up to date, this shouldn't be a problem.
In order to run a virtual version of Windows 8 you'll need theWindows 8 ISO - we'd recommend grabbing the 32-bit, just because it's a little less exacting specifications wise. You'll need the virtualisation software for the host machine as well. For this tutorial we've used VirtualBox, although the setup is similar for VirtualPC as well.
1. Welcome to the machine
Install and run VirtualBox and then click the 'New' button to create a new virtual machine (or VM for short). Give your virtual machine (or VM for short) an obvious name, such as "Windows 8 CP" and then select Microsoft Windows as your OS type and Windows 8 from the drop down menu, or Windows 8 (64-bit) if you're going down that route.
2. Minimum specifications
The next screen enables you to define how much memory your virtual system has. Windows 8 has a minimum memory requirement of 1GB for the 32-bit version, but we'd recommending electing to go for 2048MB unless your physical machine is a bit strapped for RAM. Click Next.
3. Create a drive image
The next step defines the virtual drive for your installation. Elect to go with the default setting to create a new hard disk. On the next screen leave the type as a VDI drive image – VirtualBox's own file format. It's fine to leave this virtual drive as being Dynamically allocated as well.
4. Size matters
Define where you want the Virtual disk to reside and change the initial drive size if you feel the need – although the default 20GB default size should be fine. After installation our Windows 8 sat at 7GB. Check the Summary is correct and then when you're ready, hit the Create button.
5. Virtual optical
Right-click the Windows 8 CP and select Settings from the drop-down list. Click on Storage, then the CD icon under IDE Controller, next click the CD icon to the right of the controller to locate your Windows 8 ISO and elect to Choose a virtual CD/DVD disk file… Point it at your Windows 8 ISO you have downloaded and then click Open.
6. Install Windows 8
You're now set to install Windows 8 CP on your virtual machine. Just make sure the virtual PC is highlighted and then hit the Start button. The installation of Windows 8 is fairly straightforward, just ensure you elect to pick a custom installation. Complete the installation and log into your account.
7. Guest Additions
Installing Guest Additions is a little trickier, as you need to install them in Safe Mode. Go to the desktop view and hit [Win]+R and launch MSConfig. Click the Boot tab, check the Safe boot and Base Video options and then OK the changes, choosing to reboot into Safe Mode.
8. Improve system integration
Install the Guest Additions from the VirtualBox Devices menu, enabling full 3D support when prompted. Don't reboot, instead clear the Safe boot and Base video options in MSConfig and then power off the VM. Increase the video memory to 128MB in the Display settings for the VM and enable 3D and 2D acceleration. Launch the VM and your done.


 Hih a lim a dan in Choose a display language ah nang zat English leh Deutsch maw Traditioanl Chinese maw nam2 mu ding in tua ah English cih click in a nuai ah Ok tawh pusuak in.
 Ok tawh pusuak in.


")


